Conditional branching introduces advanced rule-based decision making within workflows, enabling dynamic adaptation based on DDR (Dynamic Data Reference), form inputs, flow steps, and other data-driven conditions. This feature enables users to build highly customized, adaptable workflows that automatically adjust based on conditions in a flow—offering greater flexibility and efficiency.
How Conditional Branches Work
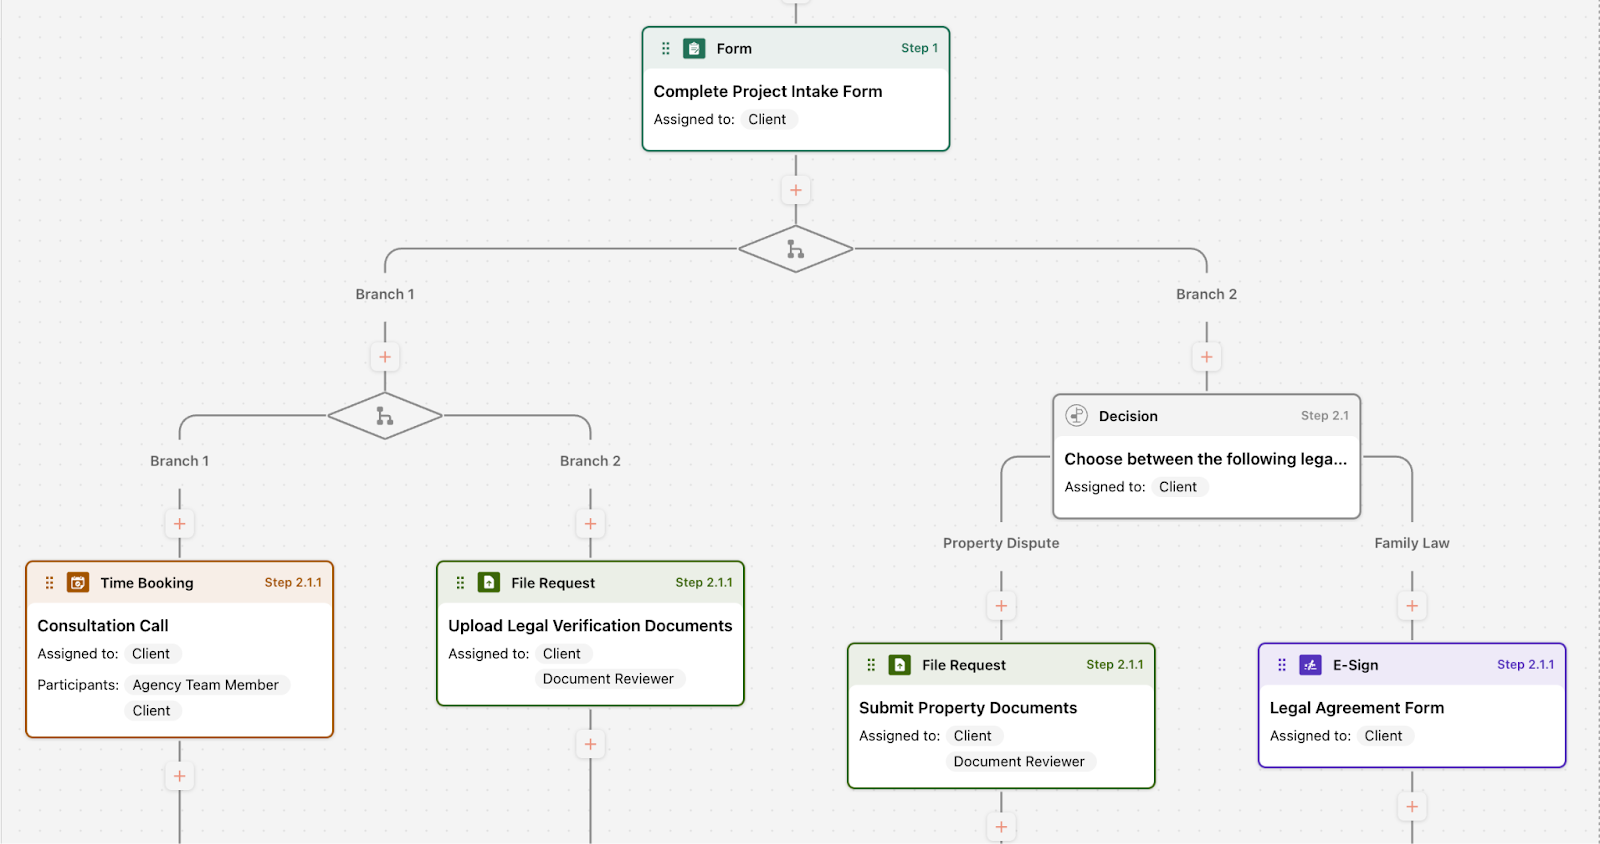
Conditional Branches dynamically reveal a set of actions, or a path, in a flow only after pre-set conditions are met. This ensures a cleaner, more intuitive workflow by reducing clutter and guiding users through only the relevant steps.
Key capabilities of Conditional Branching include:
-
Dynamic Action Display: Actions for a specific path appear only when triggered by predefined conditions, making workflows clearer and more structured.
-
Enhanced Logic: Supports decision-making beyond simple form inputs, incorporating DDR, flow outcomes, and multiple rule-based conditions.
-
Dual Path Support: Each Conditional Branch can support two distinct branches providing greater customization while maintaining workflow simplicity.
-
Automated Execution: Unlike decision branches that require user input, Conditional Branches automatically determine the correct workflow path based on data inputs.
This feature is particularly use for businesses managing complex flows, such as client onboarding, contract adjustments, or tasks assignments for example, where decision points depend on specific client inputs or external factors.
Accessing Conditional Branching
You can either add an conditional branch to an existing flow workspace template from the Library, or create a new flow template.
To add an Conditional Branch in an existing flow workspace template:
- Click on Library in the top navigation bar to use any existing flow templates. You will find various flow templates saved here.
- Choose any saved flow template you want to edit. Click on it and then select Edit to start editing the flow.
- Identify the point where you want to add a Conditional Branch in the flow.
- Now you can either drag and drop the Conditional Branch box, from the left-side panel under control. Alternatively, you can click the '+' icon to add a Conditional Branch.
- Select Conditional Branch from the options shown.
Users can leverage DDR when setting up branching conditions, enabling tailored and data-driven workflow paths.
Setting Up Conditional Branches in a Flow
- Add a title and description to the Conditional Branch. For example, “Document submission for tax preparation" You can also add a description for clarity.
- Under “Rule 1”, choose a specific form question, or leverage DDR to trigger the branch. For example, you can set a question like 'What is your credit score?' as a key trigger to determine the flow path. Users can set multiple rules based on their requirements.
- Select the condition that will activate the branch. This could be a specific answer, such as a particular type of service requested. You have the option to choose whether all rules must be met, or if any rule can trigger the branch.
- Once conditions are met, proceed to configure the branch. If all (or any, depending on your selection) of the rules are met, the user will be directed to Branch 1. If the conditions are not satisfied or incomplete, they will be routed to Branch 2.
- Click Add to save and finalize the conditional branch rules. You have now created two distinct paths in your workflow, enables users to be directed down a specific path based on the conditions you've defined.
Setting Conditional Branch Rules Based on Variable Types
When configuring Conditional Branch rules, the available conditional logic options will vary depending on the type of variable you've selected.
-
Text inputs: Conditional logic includes: is, is not, contains, does not contain.
-
Numbers or Currency: Conditional logic is based on numerical comparisons, such as: is, is not, greater than, greater than or equal to, less than, less than or equal to.
-
Address or Country: Choose from a dropdown list of countries. Each rule can include only one country. To apply logic to multiple countries, create a separate rule for each.
-
Form responses or multi-selection fields: Conditional logic can contain or exclude multiple options in one rule.
-
Dates: Select date-specific conditions, such as: is, is not, is before, is after, on or before, on or after. You can also set custom date ranges.
Adding Actions into a Conditional Branch
Add actions in each branch based on the paths you would like supported in the flow. To add actions in a branch:
- Click the '+ icon in the Conditional Branch.
- Add any action based on your requirements.
- Then review and click Save.
Now you have successfully created a Conditional Branch in your flow, providing a customized experience based on conditions met.
Nested Conditional Branches
Leverage nested branching logic within Flows to streamline advanced processes, such as multi-level approvals or tiered client onboarding.
To Nest One Branch Within Another:
- Open the Flow Builder and navigate to where the first branch will be added.
- Drag and drop Conditional Branch from the left-hand panel under Control, or click the '+' button between actions in the flow and select Conditional Branch.
- Configure the Conditional Branch based on workspace or action data. This automatically creates "Branch 1" and "Branch 2".
- Click the '+' icon under either branch and select Conditional Branch to nest a new branch within the original. Add the available Actions, Automations, and Controls to the new branches.
Users can nest one Conditional or Decision Branch inside another, with a maximum depth of two levels within a single path.
Assignee Experience
When a user is assigned actions in a flow that has Conditional Branches, the path that appears depends on the selections the user makes in a form action or any other action details. The actions for a chosen path will only appear once the trigger condition is met.
The assignee will:
- Click on Get Started and enter the flow workspace.
- As the flow proceeds, the assignee will complete a Form action, or any predefined action for the conditional branch.
- After a condition is met, based on the user input, the user will be guided to the next action.