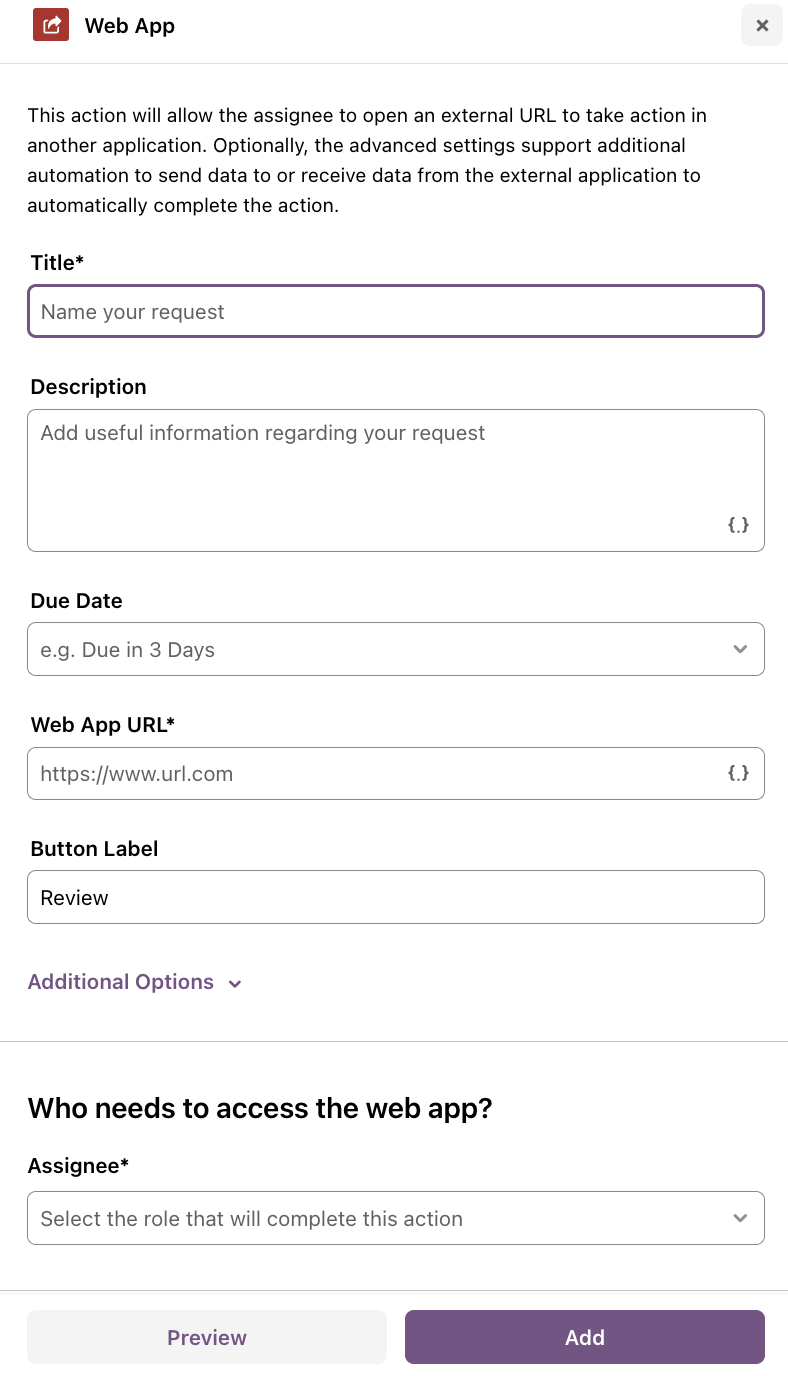
The Web App action enables assignees to open an external URL in order to complete an action in another application. This feature also support advanced automation, enabling you to send data to or receive data from the external application—streamlined processes, reducing manual effort, and saving valuable time.
Adding Web App to a Flow Template or an Instant Flow:
- Once you are in the flow builder, locate the desired place where you need the Web App action to be added.
- Drag and drop Web App from the left-hand panel under Actions, or click the '+' plus icon between actions in the Flow and select Web App.
Adding Web App to a Live Flow:
- Go to the desired flow workspace.
- Click on the '...' ellipses icon.
- Select + Add New Action from the dropdown menu.
- Then scroll down and choose Web App under Actions.
- Identify the step where you want to insert the new action, and click + Add Here.
Configuring the Web App action
- Fill in the following details:
- Title: Name your request. Choose a title that is descriptive enough for the assignee to understand the action.
-
Description: Add useful details regarding your request.
- Leverage the DDR (Dynamic Data Reference) by clicking on the ‘{.}’ autofill icon to pull data from workspace details, including workspace variables, and previous action details.
-
Set the action Due Date, selecting from:
- No Due Date
- Due in 3 days
- Due in 5 days
- Due in 1 week
- Due in 2 weeks
-
Custom Due Date: Click on Custom... from the dropdown menu and specify the number of days to start the action. You can select from the action start date, before the workspace end date or select a specific date to customize. Click Save to apply.
-
Users can exclude weekends when setting due dates for actions. When enabled, weekends will be skipped in the calculation of due dates, ensuring that deadlines fall only on weekdays.
-
Fill in the Web App URL.
- Web App URL*: Enter URL where the action will take place.
- DDR (Optional): Use DDR to automatically fill in relevant data like workspace details including workspace variables, and previous action information, by clicking on the ‘{.}’ autofill icon.
- Button Label: Set the button label that will appear in the action. For example, you can name it 'Review'.
-
Set Additional Options. This is optional.
- Skip Sequential Order: If enabled, this action can be completed in parallel with the previous action in the workflow.
-
Require Preparation: If enabled, the preparer will need to edit this action before it is ready for assignees.
-
Select the AI Prepare Agent (if enabled) to auto-prepare actions in the flow, or select any other role in the flow for a human reviewer. The Prepare Agent prepares actions based on configuration, from dynamically updating the title and description to attaching files from prior uploads.
-
Select the AI Prepare Agent (if enabled) to auto-prepare actions in the flow, or select any other role in the flow for a human reviewer. The Prepare Agent prepares actions based on configuration, from dynamically updating the title and description to attaching files from prior uploads.
-
If you assign the AI Prepare Agent to the action’s preparer role:
- Click Configure to set the preparation rules and escalation guardrails:
- Select Preparation Rules such as:
- Autofill form fields
- Set or rewrite the action title
- Update the action description
- Attach relevant files
- Configure Escalation details for when the agent will hand preparation off to a human if manual intervention is required.
- Click Save to finalize the configuration.
- Select Preparation Rules such as:
- Click Configure to set the preparation rules and escalation guardrails:
-
Next, set Assignees.
- Who needs to access the Web App: Choose the assignee who will be performing this action. You can assign the action to a role, or to specific users, teams, or client groups.
-
To automate and enhance the action, you can append extra data to the HTTP request made to the external URL.
-
Append Data - Available parameters include:
- Workspace ID: Unique identifier for the workspace where this action belongs.
- Transobject ID: Unique identifier for this action in the workspace.
- Assignee Email: The email of the user performing this action.
- Assignee Name: The name of the user performing this action.
- Assignee Unique ID: A unique ID assigned by a third-party app.
-
Set HTTP Method
- GET: Submits data as a query string into the URL. Examples are https://www.url.com?conversation_id=<conversation_id>&transobject_id=<transobject_id>
- POST: Submits data as form data (key & value) to your app.
-
Append Data - Available parameters include:
- Now, you can select how this action should be completed after the user interacts with the web app.
- Manual: The user will need to manually click Complete to mark the action as completed after interacting with the external application. You will need to select who should complete this action.
-
Automatic: This will complete the action automatically when the external application sends a webhook to your system. If you select this option, your web application must send a POST request with the necessary payload data to complete the action.
- Endpoint: An example is https://smdemo.moxo.com/v1/completeTransobject
-
Payload: A JSON object with conversation_id and transobject_id as the required properties.
- Example payload is {"conversation_id": "<Workspace ID>", "transobject_id": "<Transobject ID>"}
-
Sample Request
- Using cURL for a POST request. An example is curl -X POST https://smdemo.moxo.com/v1/completeTransobject -d '{"conversation_id":"BOFHb9PpEy8LnhLfYadXjTL","transobject_id":"22"}'
- Basic Authentication (optional): If your web app requires authentication, include the username and password. An example is curl -X POST https://smdemo.moxo.com/v1/completeTransobject -d '{"conversation_id":"BOFHb9PpEy8LnhLfYadXjTL","transobject_id":"22"}' --user "username:password"
- Before finalizing the Launch Web App action, test the request to ensure everything is set up correctly.
- Next, preview and finalize your configuration by clicking Preview.
- Then click Add to finalize and add the Launch Web app action to your workflow.
Assignee Experience
To complete a Web App action as an assignee:
- Open the desired Flow Workspace where the action is assigned to you.
- Click on the specific Web App action within the Flow. A hover pop-up panel will appear on the right, displaying the action details.
- Complete the following steps based on the type of assignee:
-
User:
- Click the button to launch the Web App. You'll be redirected to the relevant site where you can complete the task.
- Click the button to launch the Web App. You'll be redirected to the relevant site where you can complete the task.
-
Team or Client Group:
- Click the button to launch the Web App.
- A confirmation pop-up titled "Action assignment" where you'll be prompted to confirm that you are taking ownership of completing the action.
- After confirming, the web app will be assigned to you, and you'll be redirected to the relevant site where you can complete the task.
- Click the button to launch the Web App.
Managing Web App
In any workspace, Internal Users have the ability to add, edit, or delete actions.
To manage a live Web App:
- Simply click on the Web App you are trying to manage in the Flow.
- Then click the ellipses ‘...’ icon. Here you will see options to Edit, Mark as Completed, or Delete.
Send an action reminder manually
Internal users can manually send reminders to assignees for open actions.
To send an action reminder:
- Navigate to the pending action.
- Click on the ‘...’ ellipsis icon next to the assignee.
- Click Send Reminder to send a notification to the assignee.
- If applicable, a timestamp of the last sent reminder will appear.