Moxo’s native e-sign action can be used to get digital signatures completed inside a Moxo workspace.
Create an E-Sign Action
Users can create a new E-Sign action in a workspace or use an action template from the Templates section for commonly used e-sign documents.
To add a new E-Sign action in a Flow:
- Click the ‘...’ icon.
- Select Add New Action from the drop down menu.
- Select E-Sign from the pop up box.
- Determine where you would like to add the new E-Sign action, then click +Add here accordingly.
- Click New E-Sign.
- You can select an existing action template here instead, then click Continue
- You can select an existing action template here instead, then click Continue
- Upload the file that needs to be signed from your computer, the Content Library, or an existing workspace. You can always replace the file once you create the action.
-
Set the action due date, selecting from:
- No Due Date
- Due in 3 days
- Due in 5 days
- Due in 1 week
- Due in 2 weeks
-
Custom Due Date: Click on Custom... from the dropdown menu and specify the number of days to start the action. You can select from the action start date, before the workspace end date or select a specific date to customize. Click Save to apply.
-
Users can exclude weekends when setting due dates for actions. When enabled, weekends will be skipped in the calculation of due dates, ensuring that deadlines fall only on weekdays.
- In the Additional Options section:
- Toggle on Skip Sequential Order, if required, to ensure the action can be completed in parallel with the previous action in the flow.
- Toggle on Save the Signed File to a Specific Folder if required, and give the folder a name.
- Enable the Require Preparation option under Additional Options, if required, to indicate whether the action requires preparation before proceeding.
-
Select the AI Prepare Agent (if enabled) to auto-prepare actions in the flow, or select any other role in the flow for a human reviewer. The Prepare Agent prepares E-Signs based on configuration, from dynamically updating the title and description to pre-filling e-signature fields.
- Only one preparer can be assigned per action, and it must be an internal user. This feature is available for all action types, except Time Booking and third-party integration actions.
-
Select the AI Prepare Agent (if enabled) to auto-prepare actions in the flow, or select any other role in the flow for a human reviewer. The Prepare Agent prepares E-Signs based on configuration, from dynamically updating the title and description to pre-filling e-signature fields.
-
If you assign the AI Prepare Agent as the action’s preparer role:
- Click Configure to set the preparation rules and escalation guardrails:
- Select Preparation Rules such as:
- Replace the e-sign document
- Set or rewrite the action title
- Update the action description
- Attach relevant files
- Configure Escalation details for when the agent will hand preparation off to a human if manual intervention is required.
- Click Save to finalize the configuration.
- Select Preparation Rules such as:
- Click Configure to set the preparation rules and escalation guardrails:
-
Use DDR for the description by clicking on the '{.}' autofill icon to reference previous action metadata (action title, ID, and description), and workspace metadata (name, ID, description, welcome message, workspace owner details, role-specific user details, and workspace variables).
- Update the title, add a description, or set a due date for the action. Click Next.
-
- Set a due date for the e-sign. Users can exclude weekends when setting due dates. When enabled, weekends will be skipped when setting due dates, ensuring that deadlines fall only on weekdays.
- Use DDR for the description by clicking on the '{.}' autofill icon to reference previous action metadata (action title, ID, and description), and workspace metadata (name, ID, description, welcome message, workspace owner details, role-specific user details, and workspace variables).
12. Enter the names of the signers who need to sign or assign the action to a Client Group, Team, or an existing role. Click Next.
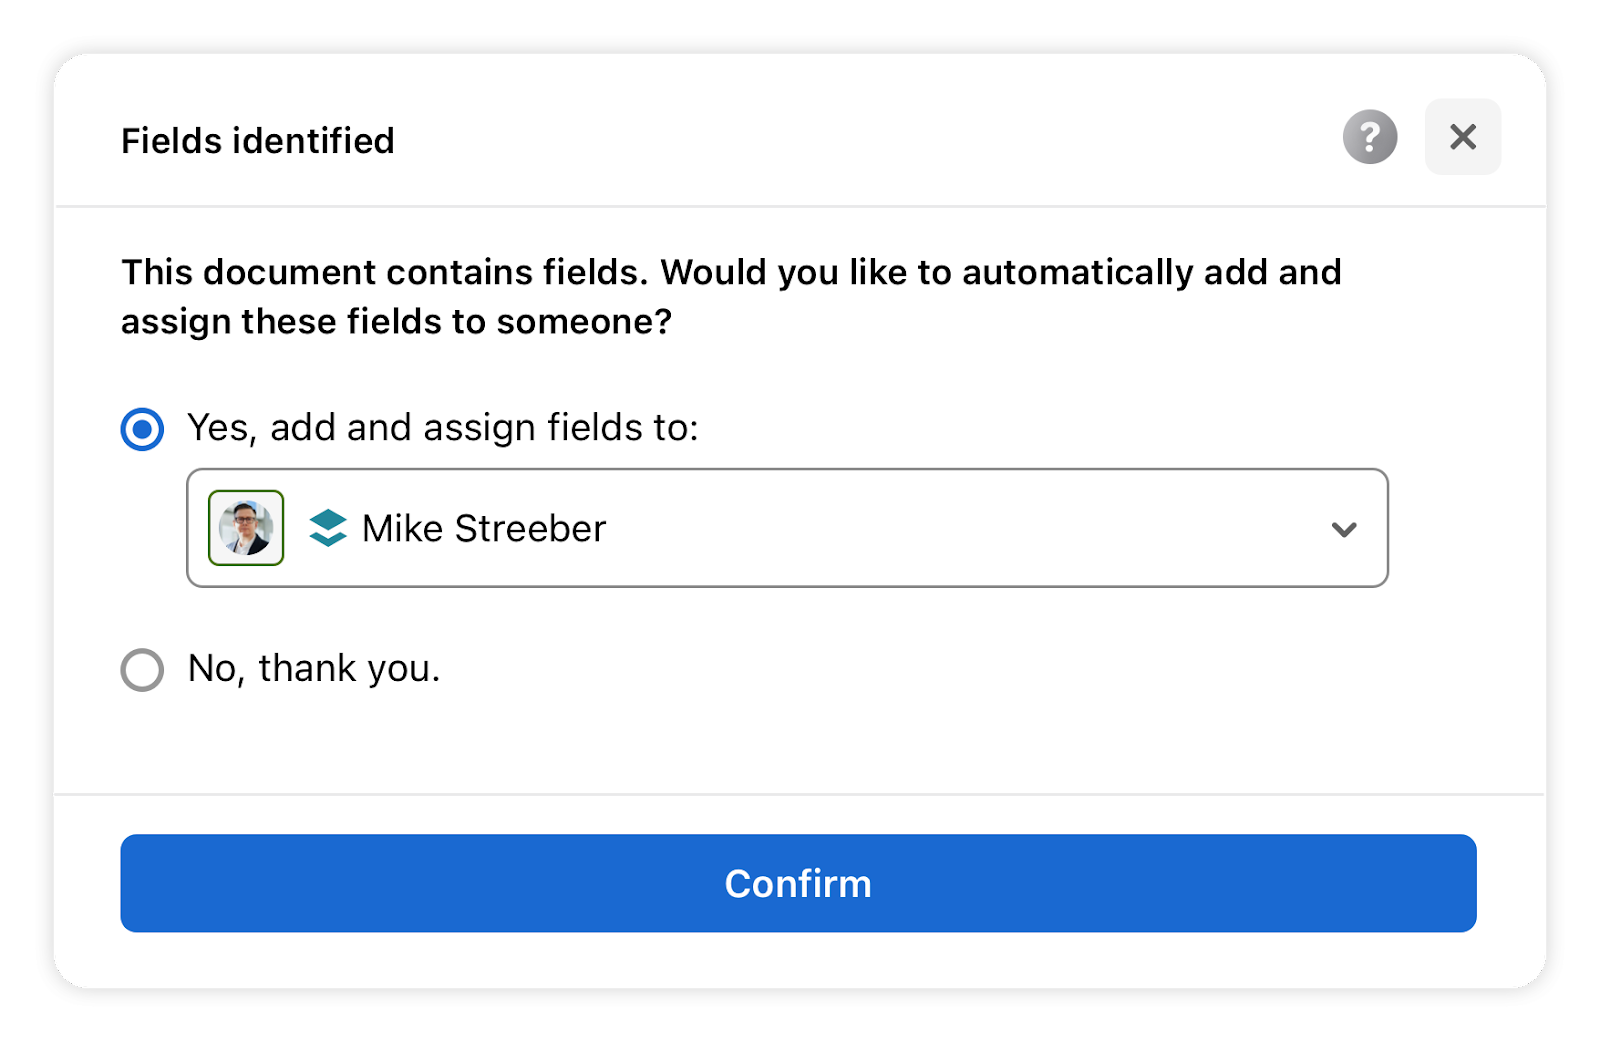
13. If the fields in the document are found, select if you would like to automatically add and assign these fields to someone or not.
14. For each signer, drag and drop fields that they need to fill out on the document. You can drag & drop fields for Signature, Initials, Date, Checkbox, Full Name, Email, Phone Number, Job Title, User ID, or Stamp. From the left side panel, you can select the signer that you are adding the fields for once all fields have been added.
15. Customize the font size when placing text fields in an e-sign. Adjust the text size after placing the text field.
While adding text fields, you can mark specific text fields as 'Required Fields', ensuring that any essential information is entered to complete the document.
Use DDR to support seamless signature file sharing between main and shadow flows.
16. Customize the date format for e-sign to support various regional preferences.
17. You can now drag and drop the stamp field to the desired location in the document and upload or attach a file from your computer, as needed.
The stamp feature can be used whenever a seal of approval is required in any agreement or document, based on business requirements.
E-Sign Text Box fields can be auto-filled with data from a Moxo form by using the Form Data in an E-Sign feature.
To add a new E-Sign action in a 1:1 or group workspace:
- Click the ‘+’ icon on the bottom of the screen.
- Select E-sign from the pop up box.
-
Click New E-Sign.
- You can select an existing action template here instead, then click Continue.
- Upload the file that needs to be signed from your computer, the Content Library, or an existing workspace. You can always replace the file once you create the action.
To add a new E-sign from New+:
- Click the ‘+New’ from top navigation bar.
- Select Action from the menu box.
-
Select the Workspace Type to add the Action to.
-
Existing Workspace
- Search for the Workspace by title.
- Click on the desired workspace
- Click Next.
-
New Workspace
- Select the new Workspace type - either a Flow Workspace or Group Workspace.
- Title your Workspace.
- Click Next to create new workspace and add the action.
-
Existing Workspace
-
Click New E-Sign.
- You can select an existing action template here instead, then click Continue.
- Upload the file that needs to be signed from your computer, the Content Library, or an existing workspace. You can always replace the file once you create the action.
Autofill PDF Feature
If you upload a PDF document when creating an E-Sign action, Moxo can automatically detect the fields and assign them to someone for you. This will save you time from manually dragging & assigning fields on a large PDF document.
All fields must be initially assigned to a single user. You will then have the option to review and edit or re-assign any fields before sending. Users can set up custom system folders and automatically send files from completed e-signatures to a specific system folder of choice.
To use the autofill feature:
- Upload a PDF document when creating an E-Sign.
- Select a person to automatically assign the detected fields to and click Confirm.
Dynamic Data Reference
Once fillable fields have been auto-generated, you have the option to use Dynamic Data Reference. This means you can transfer responses filled out in a Form to the auto-generated fields in the PDF.
To use Form data in auto-generated fields:
- Click on an auto-generated field within the document.
- Then click Autofill on the top right of side of the panel on the right.
- Next, select the corresponding question from a previous Form in the workspace. Adjust sizing of the response if required.
- Click Save Changes.
Assignee Experience
Users assigned an E-Sign will be able to electronically sign the document from any device.
When a user is assigned an E-Sign, they will find it in the Flow or any workspace. Additionally, users will receive notifications whenever an action is assigned to them.
The e-sign provides a faster and more efficient experience. When users click Sign, they are taken directly to the signing page, allowing them to complete the process without navigating through multiple steps. This streamlined approach reduces friction and helps users finalize their signatures quickly and effortlessly, improving overall productivity and user satisfaction.
To complete the E-Sign action:
- Click on the E-Sign and view the details.
- Click Sign, which will take you directly to the signing page.
- Choose the electronic representation of your signature and initials. You can draw your signature or select from one of the digital signature options. Click Accept.
- After clicking Accept, you will be directed to the signing page.
- Fill out each field that was assigned to you, clicking Next to move from one field to the next.
- Click Finish to complete.
Progress is automatically saved as each field is completed. Signers may exit and resume later with their progress preserved, allowing completion over multiple sessions.
Replacing an E-Sign File
Once you have created an e-sign action, you can always edit the action and replace the file. Any Internal User in the workspace will be able to edit the E-sign.
To delete and replace the file in an E-sign:
- Click on the E-sign in the workspace, and view the details.
- Click on the ‘...’ ellipsis icon on the top right to see more options.
- Click Edit, and the e-sign will open in a popout.
- Next to the file, you will see a ‘Trash’ icon and a ‘Replace’ icon. Click the ‘Replace’ icon to replace the file, or the ‘Trash’ icon to delete the existing file.
- Replacing the file will keep all added fields in the same position as placed in the previous file.
- Deleting the file will also delete all added fields.
- Select a new file to upload from your Desktop, Content Library files, or a file within a workspace in Moxo. Then click Next.
- Verify the users that need to sign. Add users to the signing list by searching for their name, email or phone number, and select the user from the drop down. Click the ‘x’ icon to the right of the user’s name to delete them from the signing list.
- Click Next.
- Leave the existing fields, add new fields, or delete fields. Then click Save Changes.
When replacing the e-sign document, all added fields in the previous file will be place in the same position in the new file. This replaces the document without needing to delete and add a new action.
Managing E-Signs
Once a document is signed, it will be locked and stored in the Signature Files folder in the Files section of the workspace.
You can view the Sign Activities on any signature document to see the history of any signing activity.
Additionally, you can download the signed document, along with a Certificate of Completion. The Certificate of Completion provides a full audit trail related to the signature, including timestamps and IP addresses.
To manage a live E-sign:
- Simply click on the E-sign you are trying to manage.
-
Then click the ‘...’ ellipses icon. Here you will see options to Edit, Mark as Completed, Delete, or Save as Template.
Send an action reminder manually
Internal users can manually send reminders to assignees for open actions.
To send an action reminder:
- Navigate to the pending action.
- Click on the ‘...’ ellipsis icon next to the assignee.
- Click Send Reminder to send a notification to the assignee.
-
If applicable, a timestamp of the last sent reminder will appear.